FORMATTING DETAILS QUICK LINKS:
What file format should I save and send my file?
What resolution should my artwork be in?
What is a "BLEED" and how do I set it up?
COLOR AND COATING DETAILS QUICK LINKS:
What color mode should my artwork be in?
Printing BLACK - Special Considerations
Printing BLUES - Special Considerations
Setting up SPOT UV files
+++++++++++++++++++++++++++++++++++++++++++++++++
FORMATTING DETAILS:
What file format should I save and send my file?
Recommended: Save as a .PDF
We prefer that you send .PDF and/or .EPS files with outlined fonts. These files are easier to handle and will likely speed up your turn-around.
Other Acceptable Formats: jpg, jpeg, psd, tif, tiff, eps, ai, and png
When exporting a PDF from programs such as Indesign or Illustrator, use these settings to make sure your .PDF files export correctly.
- Adobe PDF Preset is set to: Press Quality
- Compatibility is set to: Acrobat 7
- If using Adobe Illustrator, save file as "Illustrator Default"
What resolution should my artwork be in?
We only formally accept and print artwork that is at least 300 DPI. However, it is possible that a lower resolution file may be printed as is or will be placed on hold until we receive new files, slowing your turn-around.
Remember: images for the web or taken from the web are usually in 72 DPI resolution and will not print well. You must make sure that you are using a 'high resolution' image of at least 300 DPI.
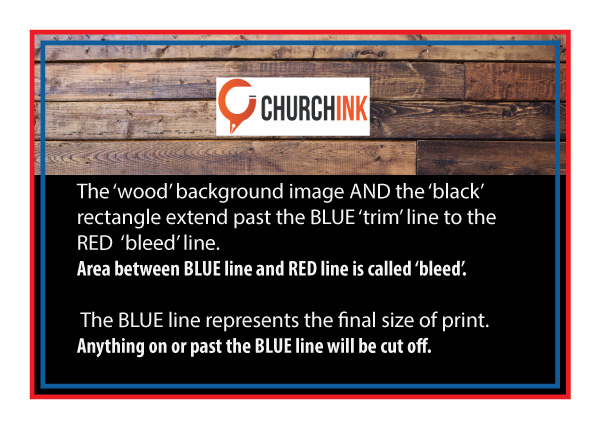
What is a "BLEED" and how do I set it up?
We require 'Bleed' for most products that we print. Bleed is the term for printing that goes right to the edge of the paper, with no 'white' around the edges.
To make sure your image 'bleeds' all the way to the edge of the paper, you MUST design your job slightly LARGER than the final cut size. This will ensure that when we cut it, all color extends to the edges.
To create a bleed, create your document .125" larger on all four sides. That means that all images, boxes, and color will extend past the edge of your final printed document.
For example, artwork for a 4" x 6" postcard should be submitted as 4.25" x 6.25" - which is .125" (1/8") larger on each side (i.e. "BLEED"). If you do not want any white on your edges, all color should extend to the bleed line.
Visual demonstration below:
COLOR AND COATING DETAILS:
What color mode should my artwork be in?
Save and send your files as CMYK. You should always start and finish your print designs in CMYK color mode.
RGB formats are best for web, not print. If you send us an RGB file, it is likely that a color shift will occur and you may not be satisfied with your job.
Printing BLACK - Special Considerations:
All black is NOT black. You need to use RICH BLACK to get a deep, dark, rich black on your final product. Rich black is an ink mixture of solid black, 100% K, with additional CMY ink values. This results in a darker tone than black ink alone. If you print black alone as 100% K, the resulting black may not be as dark as you might like.
We recommend using: C 60 M 40 Y 40 K 100
Printing BLUES - Special Considerations:
When using a blue in your design, always make sure to leave at least a 30% difference in your Cyan and Magenta values.
EXAMPLE: 100% C 70% M 0% Y 0% K
Blue is close to purple in the CMYK spectrum. Remember, use a low amount of magenta whenever using high amounts of cyan to avoid purple.
EXAMPLE: C-100 M-70 Y-0 K-0
Preparing artwork for SPOT UV or SPOT AQ:
When creating a Spot UV job, you must include a Spot UV template file along with the regular full color file. The Spot UV template file is used to show where the UV will be placed. For example, for a Business Card that will have SPOT UV and FULL COLOR printing on BOTH Sides, you should upload the following:
- Front Full Color Artwork
- Front SPOT UV detail
- Back Full Color Artwork
- Back SPOT UV detail
On the Spot UV file ONLY, use 100% K to indicate where you would like the UV. White will indicate no UV. NOTHING else should be in the Spot UV detail file except the SPOTS that you want UV varnish applied.